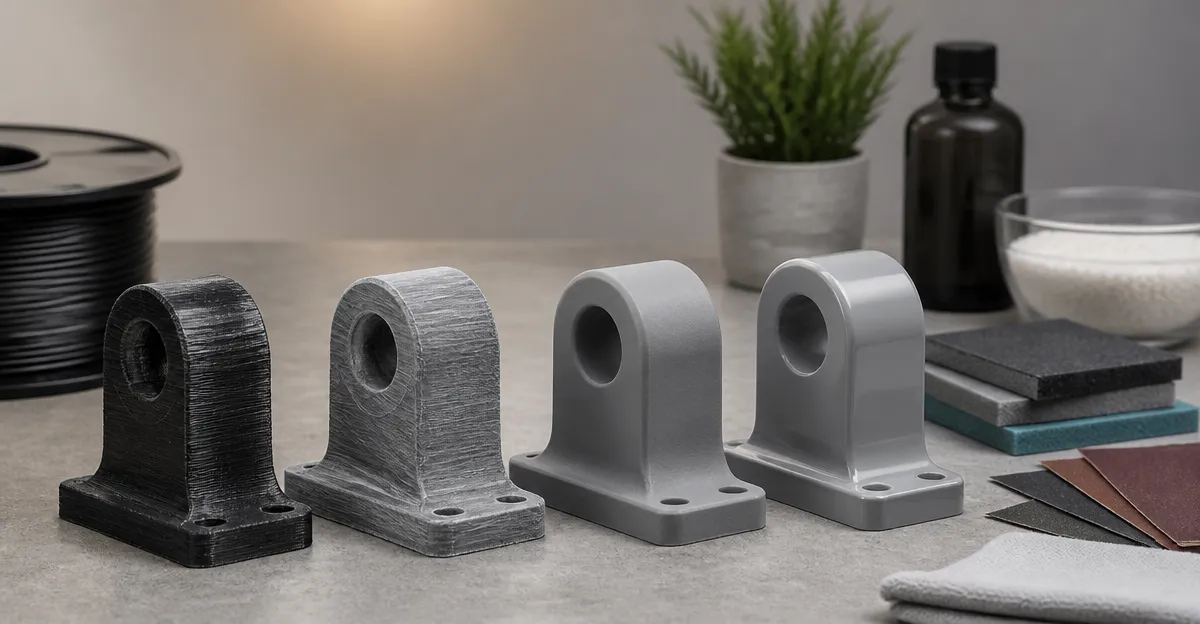
3D Printed Part Finishing Techniques for Smooth Surfaces: The Ultimate Step‑by‑Step Guide
Introduction
The appearance of a 3D printed part often determines whether it is suitable for a prototype, a functional component, or a decorative object. This guide explains the full workflow required to transform raw layer lines into a polished, professional surface. Readers will learn how to assess surface defects, select the appropriate sanding, chemical, and coating methods, and choose tools that complement their printer hardware. By the end of the article, one will be able to finish prints with confidence, regardless of the material or printer used.
Background/Context
Fused deposition modeling (FDM) creates objects by extruding thermoplastic filament in thin layers, typically 0.1–0.4 mm thick. The layer‑by‑layer nature produces visible ridges, minor gaps, and sometimes uneven extrusion. While these characteristics are acceptable for rapid prototyping, many applications demand a smoother finish for aesthetic or functional reasons, such as reducing friction or improving paint adhesion. Understanding the material properties of PLA, PETG, ABS, TPU, and specialty filaments is essential because each reacts differently to sanding abrasives, solvents, and heat.
Modern printers incorporate features that reduce post‑processing effort. For example, the Bambu Lab P1S Combo offers high‑speed CoreXY motion, enclosed printing, and an Automatic Material System (AMS) that enables multi‑color prints with consistent extrusion. The Bambu Lab P1S provides the same speed and precision without the AMS, making it a cost‑effective choice for single‑color projects. The Bambu Lab A1 Mini is a compact, beginner‑friendly printer that delivers reliable prints at lower volume, while the FlashForge AD5X excels in multi‑color, high‑speed production with a robust CoreXY frame. Knowing the capabilities of these machines helps determine which finishing technique will be most efficient.
Understanding Surface Imperfections
Before applying any finishing method, it is important to diagnose the type of defect present. Common issues include:
- Layer lines: Visible ridges caused by the nozzle path; most prevalent on larger prints.
- Stringing and blobs: Small filament strands or droplets left by retraction errors.
- Surface roughness from infill patterns: Certain infill geometries create uneven outer walls.
- Material‑specific artifacts: ABS may exhibit warping, while TPU can show surface stretching.
Identifying the root cause guides the selection of sanding grit, solvent, or coating. For example, PLA benefits from fine‑grit sanding followed by a thin acrylic spray, whereas ABS responds well to acetone vapor smoothing.
Sanding and Smoothing Techniques
Sanding remains the most versatile method for reducing layer lines on any thermoplastic. The process involves three stages: coarse, medium, and fine grit, each removing progressively less material while refining the surface.
- Coarse sanding (200–400 grit): Use a hand‑held block or a rotary sander to flatten prominent ridges. Apply even pressure to avoid creating low spots.
- Medium sanding (800–1500 grit): Follow with a flexible sanding pad to smooth the surface created by the coarse stage. This step also prepares the part for the final polish.
- Fine sanding (2000–3000 grit): Finish with ultra‑fine paper or a polishing pad. A final wipe with isopropyl alcohol removes dust and reveals the true surface texture.
When sanding prints produced by the Bambu Lab P1S Combo, the high precision of its 0.4 mm nozzle often results in smoother initial layers, allowing the user to start at the medium grit stage and reduce overall sanding time. The enclosed design also minimizes warping, which means fewer low spots to correct.
Chemical Smoothing Methods
Chemical smoothing uses solvents to melt the outermost layer of a print, effectively erasing layer lines. The method is material‑specific and requires proper ventilation.
- Acetone vapor for ABS: Place the part in a sealed chamber with a small amount of acetone. The vapor softens the surface, creating a glossy finish within minutes.
- Ethyl acetate for PLA: A less aggressive solvent that produces a satin finish without excessive swelling.
- THF (tetrahydrofuran) for PETG: Provides a high‑gloss result but demands strict safety precautions.
The FlashForge AD5X supports multi‑material printing, enabling users to print a support structure in a solvent‑resistant filament while the primary part uses a solvent‑sensitive material. This approach reduces post‑processing effort because the support can be dissolved without affecting the finished surface.
Coating and Finishing Options
After sanding or vapor smoothing, applying a coating can protect the part, enhance aesthetics, and improve mechanical performance. Common coatings include:
- Acrylic spray paint: Provides a uniform matte or gloss finish; ideal for PLA and PETG.
- Epoxy resin coat: Creates a high‑gloss, durable surface that can fill minor imperfections.
- UV‑curable clear coat: Offers rapid curing and excellent resistance to yellowing, especially useful for outdoor parts.
When using the Bambu Lab A1 Mini, its quiet operation and compact size make it perfect for printing small decorative objects that will later receive an acrylic spray. The printer’s auto‑calibration ensures consistent layer height, which translates to a more even coating application.
Post‑Processing Tools and Equipment
Investing in quality tools accelerates the finishing workflow and yields repeatable results. The following items are recommended for the techniques described above:
- Variable‑speed rotary sander: Allows precise control of sanding speed, reducing the risk of overheating the plastic.
- Ventilated vapor chamber: Essential for safe acetone or ethyl acetate smoothing; includes a built‑in exhaust fan.
- Digital caliper: Verifies dimensional stability after sanding, ensuring that critical tolerances remain within specification.
- UV curing station: Provides consistent exposure for UV‑curable coatings, especially when finishing prints from the FlashForge AD5X.
Comparison/Selection Guide
| Feature | Bambu Lab P1S Combo | Bambu Lab P1S | Bambu Lab A1 Mini | FlashForge AD5X |
|---|---|---|---|---|
| Build Volume (mm³) | 225×225×250 | 260×260×260 | 150×150×150 | 220×220×220 |
| Max Speed | 500 mm/s | 500 mm/s | 250 mm/s | 600 mm/s |
| Multi‑Color Capability | Up to 16 colors (AMS required) | Up to 16 colors (AMS optional) | Single‑color (no AMS) | Up to 4 colors |
| Price (USD) | $549.00 | $399.00 | $234.00 | $349.00 |
| Average Rating | 4.3/5 (603 reviews) | 4.5/5 (319 reviews) | 4.4/5 (120 reviews) | 4.0/5 (1,001 reviews) |
| Best For | Professional multi‑material prototyping | High‑speed single‑color production | Desktop hobbyist and education | Rapid multi‑color batch printing |
Best Practices & Tips
- Always calibrate the printer’s bed before printing; a level bed reduces the need for aggressive sanding.
- Start sanding with the coarsest grit that removes the most visible lines, then progress to finer grits to avoid deep scratches.
- When using chemical smoothing, perform a small test on a sacrificial piece to gauge solvent exposure time.
- Apply coatings in a dust‑free environment; even microscopic particles can become visible after curing.
- Document the finishing workflow for each material; repeatable results rely on consistent parameters.
FAQ
- Can I sand PLA without damaging the part?
- Yes. Use medium (800‑1500 grit) sandpaper first, then finish with 2000‑3000 grit. PLA is softer than ABS, so avoid excessive pressure.
- Is acetone safe for ABS prints from the Bambu Lab P1S?
- Acetone vapor is the industry standard for ABS. Ensure the chamber is well‑ventilated and wear protective gloves.
- Do I need an AMS to print multi‑color parts on the Bambu Lab P1S Combo?
- Yes. The AMS (Automatic Material System) supplies up to 16 colors and manages filament changes automatically.
- How do I prevent nozzle clogs when printing TPU on the FlashForge AD5X?
- Print at a slightly higher temperature (220‑230 °C) and use the built‑in filament backup system to avoid long idle periods.
- What is the best coating for a functional gear printed in PETG?
- A thin epoxy resin coat provides wear resistance while maintaining dimensional accuracy.
- Can I use the same finishing workflow for prints made on the A1 Mini?
- Yes, but due to the smaller build volume, handle parts gently during sanding to avoid breakage.
- Is the FlashForge AD5X’s 1‑Click Auto Leveling reliable for large prints?
- The feature consistently measures multiple points and compensates for minor bed warps, making it suitable for prints up to 220 mm.
Conclusion
Finishing 3D printed parts transforms raw layers into professional‑grade surfaces suitable for display, functional use, or further manufacturing steps. By understanding material behavior, applying systematic sanding, leveraging chemical smoothing where appropriate, and selecting the right coating, users can achieve a flawless finish. The printers highlighted in this guide—Bambu Lab P1S Combo, Bambu Lab P1S, Bambu Lab A1 Mini, and FlashForge AD5X provide the hardware foundation for reliable, high‑quality prints, while the finishing techniques described ensure those prints meet the highest aesthetic standards.
Products Featured in This Guide
Bambu Lab P1S Combo
Price: $549.00 | Rating: 4.3/5 (603 reviews)
Featured because its high‑speed CoreXY motion and AMS enable multi‑color prints that require minimal post‑processing, making it ideal for professional finishing workflows.
Bambu Lab P1S
Price: $399.00 | Rating: 4.5/5 (319 reviews)
Featured for its exceptional speed and reliability in single‑color prints, providing a solid platform for sanding and coating techniques.
Bambu Lab A1 Mini
Price: $234.00 | Rating: 4.4/5 (120 reviews)
Featured as a compact, beginner‑friendly printer that excels in small decorative projects where acrylic spraying and fine sanding are common.
FlashForge AD5X
Price: $349.00 | Rating: 4.0/5 (1,001 reviews)
Featured for its ultra‑fast 600 mm/s CoreXY architecture and four‑color IFS, which make it perfect for high‑volume multi‑color finishing projects.
Frequently Asked Questions
What are the most effective sanding steps for removing layer lines on FDM prints?
Start with a coarse grit (80‑120) to flatten major ridges, then progress to medium (200‑400) and finish with fine grit (800‑2000) for a smooth surface.
Can chemical smoothing be used on all common 3D printing materials?
No; solvents like acetone work on ABS, while PLA requires specialized vapors (e.g., ethyl acetate) and TPU generally cannot be chemically smoothed.
How does applying a primer improve the final appearance of a printed part?
Primer fills micro‑imperfections, creates a uniform base, and enhances paint adhesion, resulting in a more professional finish.
What safety precautions should be taken when using vapor smoothing or sanding?
Use a well‑ventilated area or fume hood, wear gloves and eye protection, and avoid inhaling dust or solvent fumes.
Is there a recommended order for combining sanding, chemical smoothing, and coating?
Typically sand to remove major defects, apply chemical smoothing for fine smoothing, then prime and coat for the final finish.