Introduction
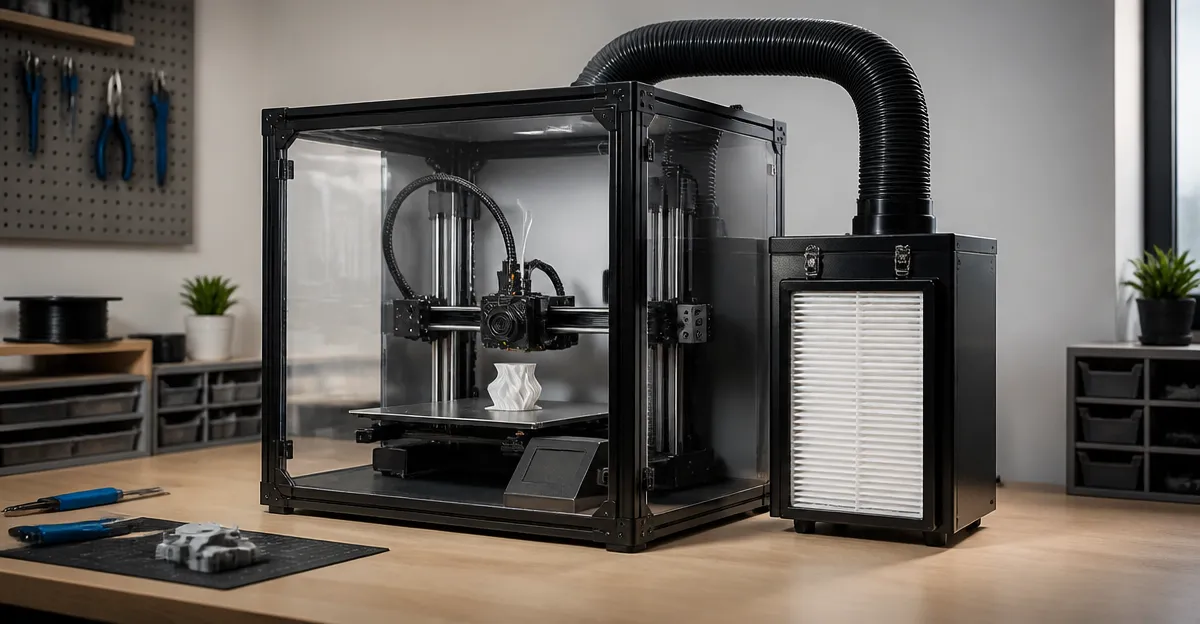
Printing with thermoplastic filaments releases ultrafine particles, volatile organic compounds, and occasional fumes that can affect indoor air quality and the health of users. This guide teaches the reader how to set up a reliable HEPA filtration system inside a 3D printer enclosure. By following the steps, one will achieve quieter operation, reduced particulate emissions, and a safer workspace, all while preserving print quality.
What You'll Need
- Enclosure material (acrylic, wood, or pre‑made printer box)
- HEPA‑rated air purifier suitable for the enclosure size
- Replacement HEPA filter compatible with the chosen purifier
- Flexible ducting or vent adapters
- Power strip with surge protection
- Silicone sealant or weather‑strip tape
- Basic tools: screwdriver, drill, measuring tape
Optional but recommended products are linked in the steps below.
Step 1: Measure the Enclosure Volume and Choose the Right Purifier
Calculate the cubic footage of the enclosure (length × width × height). For a typical desktop printer, the volume ranges from 100 to 250 ft³. Select a purifier that can exchange the air at least 4‑5 times per hour for that volume. The Levoit Core 300 Air Purifier offers a CADR of 143 CFM, capable of refreshing a 1,073 ft² area once per hour, which comfortably exceeds the requirement for most printer enclosures. It is priced at $84.99, carries a 4.7/5 rating from 108,310 reviews, and operates at a whisper‑quiet 24 dB in Sleep Mode—ideal for a quiet workshop.
Why this model? Its compact footprint (12 × 12 × 13 in) fits easily on a printer table, and the true HEPA filter captures 99.97% of particles down to 0.1 µm, including the ultrafine polymer fumes generated during printing.
Step 2: Prepare the Enclosure and Create an Intake/Exhaust Path
Cut two openings of 4‑6 in diameter on opposite sides of the enclosure: one for air intake and one for exhaust. Attach flexible ducting to each opening. Seal the duct connections with silicone to prevent leaks. If the enclosure is made of acrylic, drill the holes before assembly to avoid cracking.
For the exhaust side, connect the duct to the rear of the Levoit Core 300 using the built‑in vent slot. The purifier’s intake will draw contaminated air from the enclosure, filter it, and release clean air back into the room.
Using a dedicated vent ensures that the purifier does not have to work against the enclosure’s sealed walls, improving efficiency and extending filter life.
Step 3: Install the HEPA Filter and Verify Compatibility
The Core 300 ships with a genuine HEPA filter, but for long‑term performance it is advisable to keep a spare. The Levoit Core 300 Replacement Filter costs $25.99, holds a 4.8/5 rating from 26,010 reviews, and features a three‑stage system (pre‑filter, HEPA, activated carbon). This filter captures pet hair, dust, smoke, and VOCs, which are common in a 3D printing environment.
Why a replacement filter matters: genuine Levoit filters are engineered to match the purifier’s airflow and pressure specifications. Using off‑brand filters can reduce CADR, increase motor strain, and void the warranty.
Install the filter by removing the front panel, sliding the filter into the slot until it clicks, and re‑attaching the panel. The filter indicator on the purifier will turn green, confirming proper installation.
Step 4: Connect Power, Seal Gaps, and Run Initial Test
Plug the purifier into a surge‑protected power strip. Set the purifier to Auto mode so it adjusts fan speed based on real‑time air quality. Use weather‑strip tape around any remaining seams of the enclosure to prevent unfiltered air from bypassing the system.
Power on the printer and start a short print. Observe the purifier’s indicator lights: a steady blue light indicates active filtration, while the timer function can be set for 2‑hour intervals during longer prints.
If the enclosure is larger than 500 ft³, consider adding a second Core 300 or upgrading to the Levoit Vital 100S Air Purifier. Priced at $139.99 with a 4.7/5 rating, the Vital 100S offers a higher CADR and a dedicated Pet Mode, which further reduces fur and dander that may cling to printed parts.
Step 5: Calibrate Airflow and Optimize for Print Quality
Use a handheld anemometer to measure airflow at the intake vent. Aim for 0.5–1.0 m/s to ensure sufficient turnover without creating turbulence that could affect print layers. Adjust the purifier’s fan speed manually if needed; the Core 300 provides three speed settings plus Sleep Mode for low‑noise operation.
For users who need continuous monitoring, the Vital 100S integrates with the VeSync app, allowing remote adjustments and filter‑life notifications. This is useful when the printer runs unattended overnight.
Finally, document the filter replacement schedule. Both the Core 300 and Vital 100S recommend changing filters every 6–8 months, but heavy printing may require more frequent swaps. Keep a log to track usage and maintain optimal filtration efficiency.
Tips & Pro Tips
- Place the purifier on the same side of the enclosure as the printer’s heated bed to capture the highest concentration of fumes.
- When printing with ABS or other high‑VOC materials, consider adding an activated‑carbon pre‑filter (included with the Core 300) for additional odor removal.
- Use a small fan to direct airflow across the printer’s nozzle area; this improves heat dissipation and reduces the chance of filament warping.
- Schedule filter changes during printer maintenance days to avoid downtime.
- If you experience excessive noise, switch the purifier to Sleep Mode or install vibration‑isolating pads under the unit.
Troubleshooting
| Problem | Possible Cause | Solution |
|---|---|---|
| Purifier does not turn on | Power strip not engaged or faulty outlet | Verify power source, try a different outlet, reset the surge protector. |
| Airflow feels weak | Filter clogged or incorrect filter installed | Replace with a genuine Levoit Core 300 Replacement Filter and ensure proper seating. |
| Excessive noise during prints | Fan set to high speed unnecessarily | Switch to Auto or Low mode; enable Sleep Mode when the printer is idle. |
| Print quality degrades | Air turbulence from vent placement | Re‑position ducting to create a laminar flow path; use a diffuser to smooth airflow. |
Conclusion
By measuring the enclosure, selecting an appropriately sized HEPA purifier, installing genuine filters, sealing the enclosure, and calibrating airflow, one can dramatically improve indoor air quality while maintaining high‑quality 3D prints. The recommended products—especially the Levoit Core 300 Air Purifier and its replacement filter—provide reliable, quiet, and cost‑effective filtration. Implement the tips and troubleshooting steps to keep the system running smoothly for years to come.
Products Mentioned in This Guide
Frequently Asked Questions
Why is HEPA filtration important for a 3D printer enclosure?
HEPA filters capture ultrafine particles and VOCs released during printing, protecting indoor air quality and user health.
How do I calculate the correct purifier size for my enclosure?
Measure the enclosure's length, width, and height to get cubic footage, then choose a purifier with an airflow rating that can exchange that volume at least 3–4 times per hour.
Can I use any HEPA air purifier in a 3D printer enclosure?
Use a purifier rated for the enclosure's volume and that includes a replaceable HEPA filter compatible with the unit.
What sealing methods prevent leaks around the enclosure?
Apply silicone sealant or weather‑strip tape around doors, vents, and duct connections to ensure a tight, airtight seal.
Will adding a HEPA system affect print quality or temperature?
Properly sized filtration maintains airflow without overheating, so it reduces particles while preserving print quality and temperature stability.