Introduction
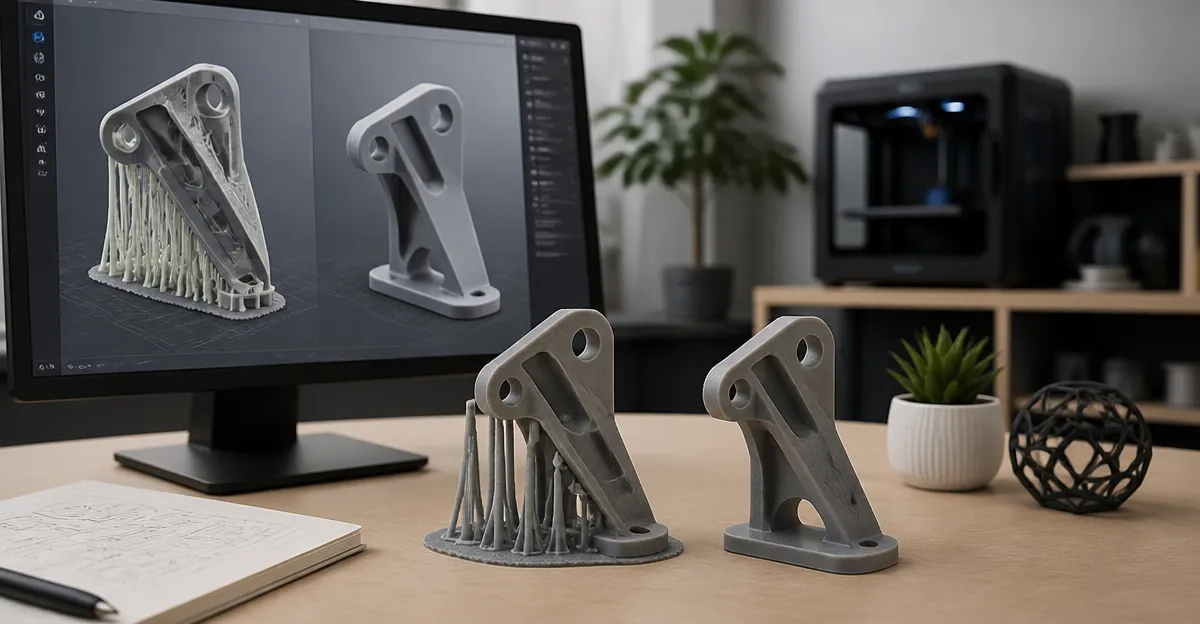
Designing 3D models that require few or no support structures saves material, reduces post‑processing time, and improves surface finish. This guide will teach the reader how to analyze geometry, choose optimal orientation, adjust slicer settings, and validate the result before printing. By following the practical steps, one can achieve faster prints, lower filament waste, and higher dimensional accuracy. The techniques are applicable to a wide range of printers, from entry‑level units to professional workhorses.
What You'll Need
- Computer with 3D modeling software (e.g., Fusion 360, Blender, or Tinkercad).
- Slicer software that supports adaptive layer height and custom support generation (e.g., Bambu Studio, Flash Studio, or Orca Slicer).
- One of the recommended 3D printers to validate the workflow.
- Basic calibration tools such as a feeler gauge or a sheet of paper for first‑layer checks.
Step‑by‑Step Instructions
1. Analyze the Geometry of Your Model
Begin by inspecting the model for overhangs, bridges, and thin walls. Identify any features that exceed a 45° angle from the build plate, as these typically require support. Use the analysis tools in your CAD program to highlight problematic areas; many packages can color‑code overhang severity. By understanding where the printer will struggle, you can plan modifications before slicing.
When a redesign is necessary, consider adding fillets, chamfers, or lattice structures that replace solid overhangs with self‑supporting geometry. For example, a 20 mm fillet on a vertical wall reduces the effective overhang angle, allowing the printer to lay down filament without auxiliary structures. This approach also improves part strength by eliminating stress concentrations.
2. Choose an Optimal Build Orientation
The orientation of the part on the build plate has the greatest impact on support usage. Rotate the model so that the largest flat surface contacts the plate; this maximizes first‑layer adhesion and reduces the need for scaffolding. Use the “rotate” and “mirror” functions in the slicer to experiment with different angles.
For parts with cylindrical features, orient the cylinder upright to avoid long overhangs on the side walls. When printing a hollow vase, a vertical orientation eliminates the need for internal supports entirely. Record the orientation that yields the smallest combined support volume.
To validate the chosen orientation, enable the slicer’s support preview. Most slicers display a transparent overlay that shows exactly where supports will be generated. If the preview reveals excessive material, return to step 1 and redesign the offending feature.
3. Adjust Slicer Settings for Minimal Supports
Modern slicers provide parameters that influence support generation. Set the “support angle” to a higher value, such as 60°, to instruct the software to ignore shallow overhangs that the printer can handle. Increase the “support density” only for critical areas; a lower density reduces filament waste while still providing adequate reinforcement.
Enable “adaptive layer height” if available. This feature prints thicker layers on low‑detail sections and thinner layers on intricate features, reducing overall print time and the need for supports on gradual slopes. Additionally, enable “bridge settings” such as “bridge flow multiplier” to improve the quality of unsupported spans.
When using the Flashforge Adventurer 5M, the built‑in Flash Studio offers a “One‑Click Auto Leveling” function that ensures the bed is perfectly planar, which is essential for reliable first‑layer adhesion in support‑light prints. The Adventurer 5M costs $249.00, has a rating of 3.9/5 from 2,494 reviews, and its 280 °C direct drive extruder can handle a wide range of materials, making it a versatile test platform.
4. Employ Advanced Support Generation Tools
Some slicers, such as Bambu Studio, include tree‑like support structures that grow only where needed, reducing contact with the model surface. Tree supports are especially useful for organic shapes with multiple overhangs. Enable the “tree support” option and adjust the “branch angle” to match the printer’s resolution.
If you own the Bambu Lab P1S, you can take advantage of its 500 mm/s printing speed to quickly iterate on support settings. The P1S is priced at $369.99, carries a 4.4/5 rating from 345 reviews, and its enclosed design maintains temperature stability for fine bridges and overhangs.
When printing with multi‑color or multi‑material parts, the Flashforge AD5X provides a four‑color IFS system that can assign different support materials to each color channel. This capability allows you to print dissolvable supports in a water‑soluble filament while the primary model uses PLA. The AD5X costs $349.00, has a 4/5 rating from 1,035 reviews, and its 300 °C extruder expands material compatibility.
5. Preview, Slice, and Fine‑Tune
After configuring supports, generate a preview slice and examine the toolpaths. Look for thin support columns that may break during removal; increase the “support Z distance” to create a small gap that facilitates easy detachment. Verify that the first layer height is set between 0.2 mm and 0.3 mm for reliable adhesion on most build surfaces.
Run a small test print of a representative section that includes the most challenging overhangs. This trial run consumes minimal filament while revealing potential issues such as warping or insufficient cooling. Adjust fan speeds and print temperatures based on the test outcome before committing to the full part.
6. Print with a Reliable Machine
When the model is ready, load it onto a printer that matches the material and speed requirements identified earlier. The Anycubic Kobra X offers a quiet operation at ≤48 dB, making it suitable for home environments where noise is a concern. Priced at $299.99 with a 4.2/5 rating from 99 reviews, it features a 260 mm cubic build volume and a 49‑point auto‑leveling system that guarantees a flat first layer.
For users who need true multi‑material capability, the Snapmaker U1 provides a 5‑second tool changer that swaps four independent toolheads, eliminating the waste associated with traditional color changes. At $849.00 and a 4.5/5 rating from 101 reviews, the U1’s SnapSwap system ensures that each filament color is pre‑heated and ready, reducing downtime and supporting complex multi‑color prints without excessive support structures.
Before starting the print, perform a bed‑level check, clean the build surface with isopropyl alcohol, and verify that the filament spool rotates freely. Initiate the print and monitor the first few layers either via the printer’s built‑in camera or a remote monitoring app. Early detection of adhesion problems prevents wasted material and time.
Tips & Pro Tips
- Use a brim or raft only when the model’s base is very small; these add minimal material compared to full supports.
- Apply a thin layer of glue stick or hairspray on the build plate for PLA to improve first‑layer adhesion without increasing support usage.
- When printing tall, slender parts, consider printing them hollow with internal lattice infill; this reduces weight and the need for internal supports.
- Experiment with “support interface layers” to create a smoother surface where supports touch the model, facilitating easier removal.
- For ABS or ASA, print within an enclosed chamber (as provided by the Bambu Lab P1S) to minimize warping on overhangs.
Troubleshooting
Problem: Supports are difficult to remove and leave marks on the surface.
Solution: Increase the Z‑offset between support and model to 0.2 mm, use a soluble support material if the printer supports it (e.g., PVA on the AD5X), and post‑process with a soft brush.
Problem: Overhangs sag or droop despite minimal supports.
Solution: Reduce print speed for the overhang layers, increase cooling fan duty cycle, and raise the nozzle temperature by 5 °C to improve filament flow.
Problem: First layer does not stick, causing the whole print to fail.
Solution: Re‑run the auto‑leveling routine, clean the bed, and adjust the initial layer height to 0.25 mm. Using a PEI sheet (included with the Adventurer 5M) often resolves adhesion issues.
Conclusion
This guide has presented a systematic approach to designing 3D prints that minimize support structures, from geometry analysis to printer selection. By applying the described orientation strategies, slicer settings, and support tools, one can achieve cleaner surfaces, faster prints, and lower material costs. The recommended printers—Flashforge Adventurer 5M, Bambu Lab P1S, Flashforge AD5X, Anycubic Kobra X, and Snapmaker U1—provide reliable platforms for testing and refining these techniques. Continued experimentation will deepen one’s understanding of how design choices influence support requirements, leading to ever‑more efficient 3D printing workflows.
Products Mentioned in This Guide
Frequently Asked Questions
How can I reduce the need for support structures when designing a 3D model?
Design with self‑supporting angles (≤45°), add chamfers, and avoid isolated overhangs or bridges.
What is the ideal overhang angle to print without supports?
Keep overhangs at 45° or less from the build plate; steeper angles usually require supports.
How does model orientation affect support usage?
Orient the part so that the largest flat surfaces face down and overhangs become self‑supporting, minimizing required supports.
Which slicer settings help minimize supports?
Enable adaptive layer height, lower support density, and use custom support blockers or tree supports to target only critical areas.
How can I verify my support‑free design before printing?
Use the slicer’s preview to check for unsupported overhangs and run a quick test print or simulation to confirm stability.